Contents Jump to section
Regular users should not be local administrators on their workstations.
That is the whole opinion. Everything else in this post is just the practical bit: how do you take control without making support hate you?
For cloud-native Windows devices, my starting point is simple:
- Devices are Microsoft Entra joined.
- Devices are managed by Microsoft Intune.
- Software and settings are deployed through Intune.
- Local admin access is the exception, not the delivery mechanism.
- Windows LAPS is there as a fallback when you actually need a local administrator password.
If a user needs an app, deploy the app. If a setting needs changing, deploy the setting. Do not give the user permanent local admin and hope nothing bad happens. Hope is not a control.
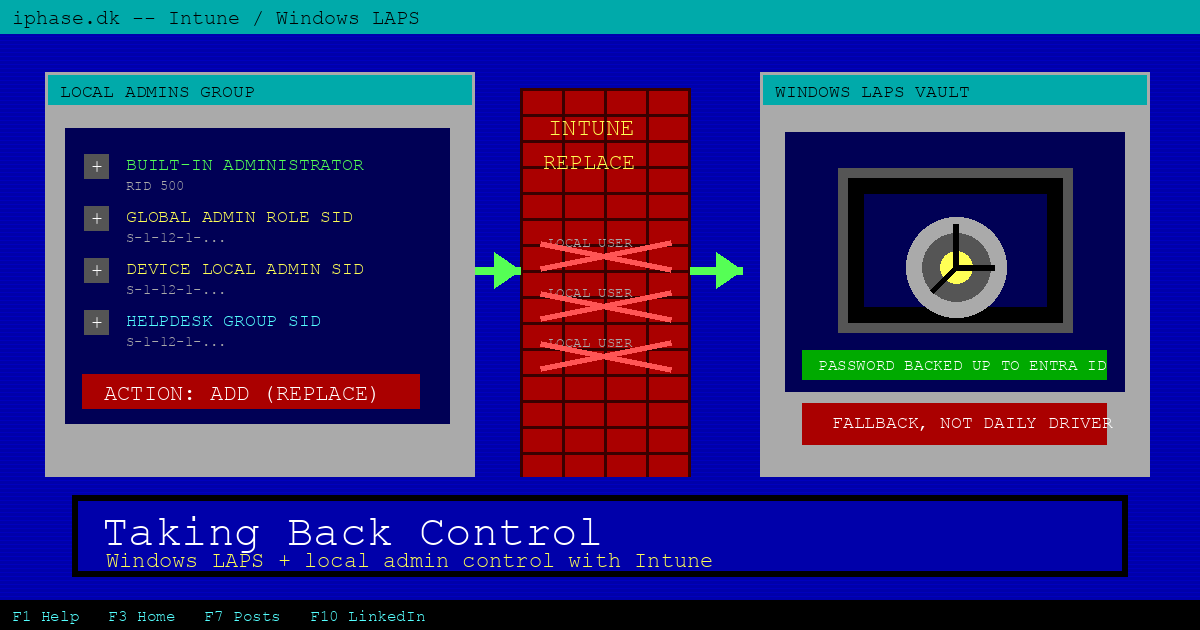
What we are building
We are going to create two Intune account protection policies:
- A Local user group membership policy that controls the local Administrators group.
- A Windows LAPS policy that manages the built-in local Administrator account password.
The first policy decides who is allowed to be local admin. The second policy gives you a break-glass password for the built-in Administrator account.
Here is what the end state looks like in Endpoint security > Account protection. You should end up with one policy for the Administrators group and one policy for Windows LAPS, both assigned to the right Windows devices.
In the screenshot, 1 is where you create a new account protection policy. 2 is the final state: one local group membership policy and one Windows LAPS policy, both assigned.

Before you touch the Administrators group
You need the basics in place first:
- Microsoft Entra joined or Microsoft Entra hybrid joined Windows devices. This post assumes cloud-native Entra joined devices.
- Intune-managed devices.
- A device group to target while you test.
- Windows LAPS enabled in Microsoft Entra ID for cloud backup and recovery.
- The SIDs for the Entra roles or groups you want to keep as local administrators.
For Entra joined devices backing up LAPS passwords to Microsoft Entra ID, you need two pieces. First, enable LAPS in Entra ID. Then deploy the client-side Windows LAPS policy with Intune. The Entra setting enables the cloud backup and recovery side. The Intune policy tells Windows which account to manage, where to back up the password, how often to rotate it, and what to do after the password is used.
In the Microsoft Entra admin center, go to Identity > Devices > Overview > Device settings, then set Enable Local Administrator Password Solution (LAPS) to Yes. Microsoft documents this in the Windows LAPS with Microsoft Entra ID guide. In the screenshot, 1 marks the Yes setting. After that, Intune can push the actual Windows LAPS settings to the devices.

Do not target every Windows device on day one. Create a pilot group, put a few known devices in it, and assign both policies to that group first. When the pilot behaves, expand from there.
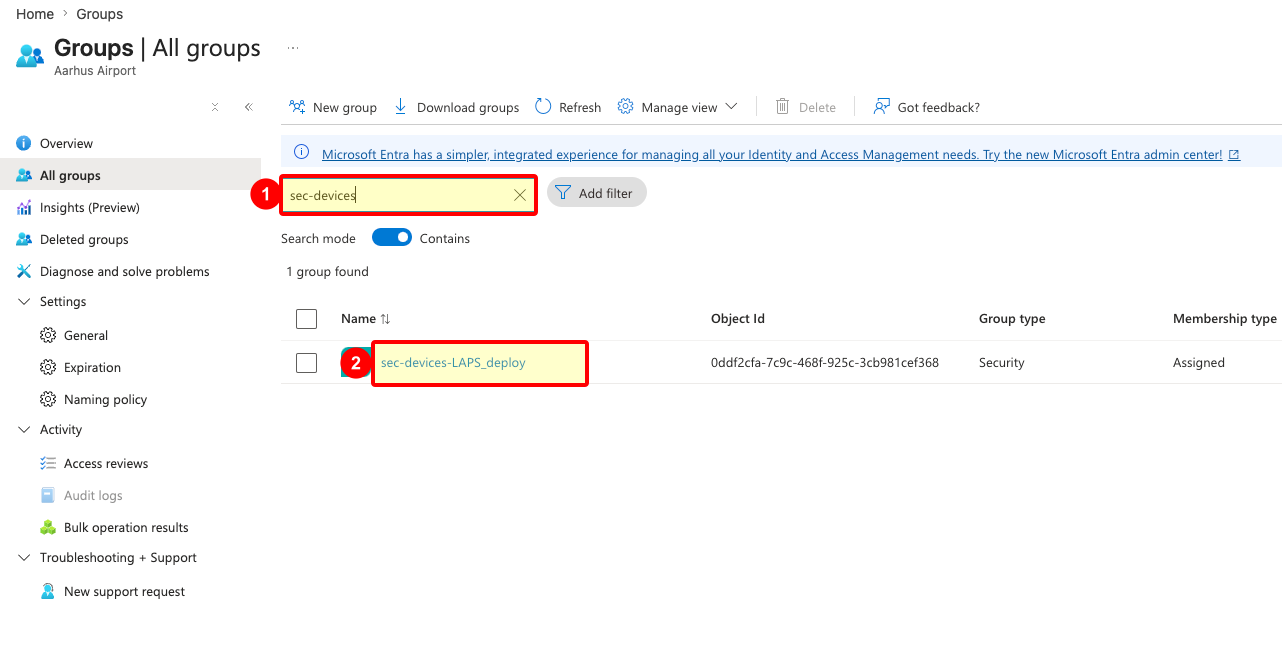
In my example I use a security group named sec-devices-LAPS_deploy. That group is only the pilot assignment target. Assign both the Windows LAPS policy and the local Administrators policy to it first, then widen the scope after you have checked the result on a few devices.
In the screenshot, 1 is the group search field. 2 is the pilot group you assign the policies to.
Get the SIDs you need
Local group membership policy can take usernames, domain usernames, and SIDs. For Entra groups and directory roles, SIDs are the safer language to use here.
For a simple starting policy, I normally include these entries:
Administratorfor the built-in local Administrator account.- The Global Administrator role SID, if you want that role to remain local admin.
- The Microsoft Entra Joined Device Local Administrator role SID, if that role is activated and used in your tenant.
- An IT support or security group SID, if you want scoped support access.
The built-in Administrator entry deserves a note. Windows resolves it to the built-in RID 500 account. That matters because LAPS can rename the account, and you still want the policy to target the real built-in account rather than a display name you happen to see today.
You can fetch the role SIDs from Azure Cloud Shell with Microsoft Graph PowerShell:
Connect-MgGraph -Identity

function Convert-ObjectIdToSid($objectId) {
    $bytes = [Guid]::Parse($objectId).ToByteArray()
    $array = New-Object 'UInt32[]' 4
    [Buffer]::BlockCopy($bytes, 0, $array, 0, 16)
    return "S-1-12-1-$array".Replace(' ', '-')
}

$roles = @("Global Administrator", "Joined Device Local Administrator")

foreach ($roleName in $roles) {
    $role = Get-MgDirectoryRole | Where-Object DisplayName -eq $roleName
    if ($role) {
        $sid = Convert-ObjectIdToSid $role.Id
        Write-Host "$roleName`n  ObjectId : $($role.Id)`n  SID      : $sid`n"
    } else {
        Write-Host "$roleName : not activated in tenant - skip`n"
    }
}
If Joined Device Local Administrator comes back as not activated, do not add a fake SID. Either activate and use the role properly, or leave it out.
Create the Administrators group policy
In the Intune admin center, go to Endpoint security > Account protection > Create Policy.
Use these values:
- Platform: Windows
- Profile: Local user group membership
- Name: something obvious, such as
Administrators Group Control - Assignment: your pilot device group
On Configuration settings, add a Local Users And Groups rule.
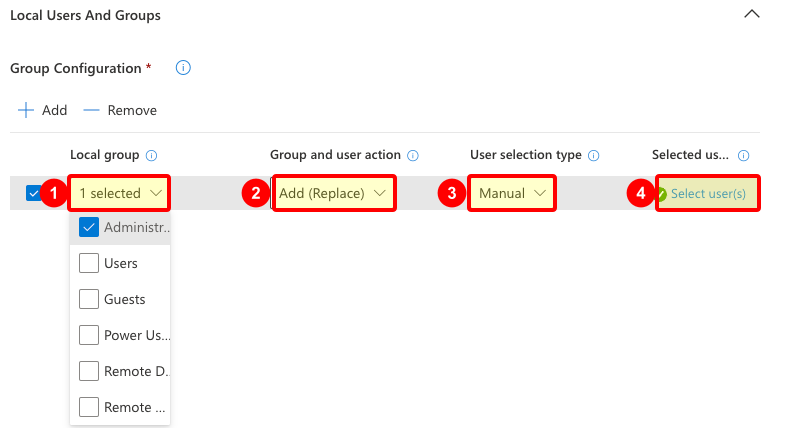
Set the rule like this:
- Local group: Administrators
- Group and user action: Add (Replace)
- User selection type: Manual
- Selected users: add
Administratorand the SIDs you decided to keep
The Local group field is not free text. Intune gives you a dropdown of built-in local groups, and you select Administrators from that list. Behind the scenes, this is one of Intune's supported built-in local group choices, not a string you typed by hand. The portal handles the built-in group selection and display for you, including localized Windows installs. Nice little feature.
The important setting is Add (Replace). Not Add (Update). Replace means Intune makes the local Administrators group match your list. Anything not in your list gets removed. That is the actual takeover.
This screenshot shows the configuration row before the user list is filled in. The numbered markers show the four controls that matter: 1 is Administrators, 2 is Add (Replace), 3 is Manual, and 4 opens Select user(s).
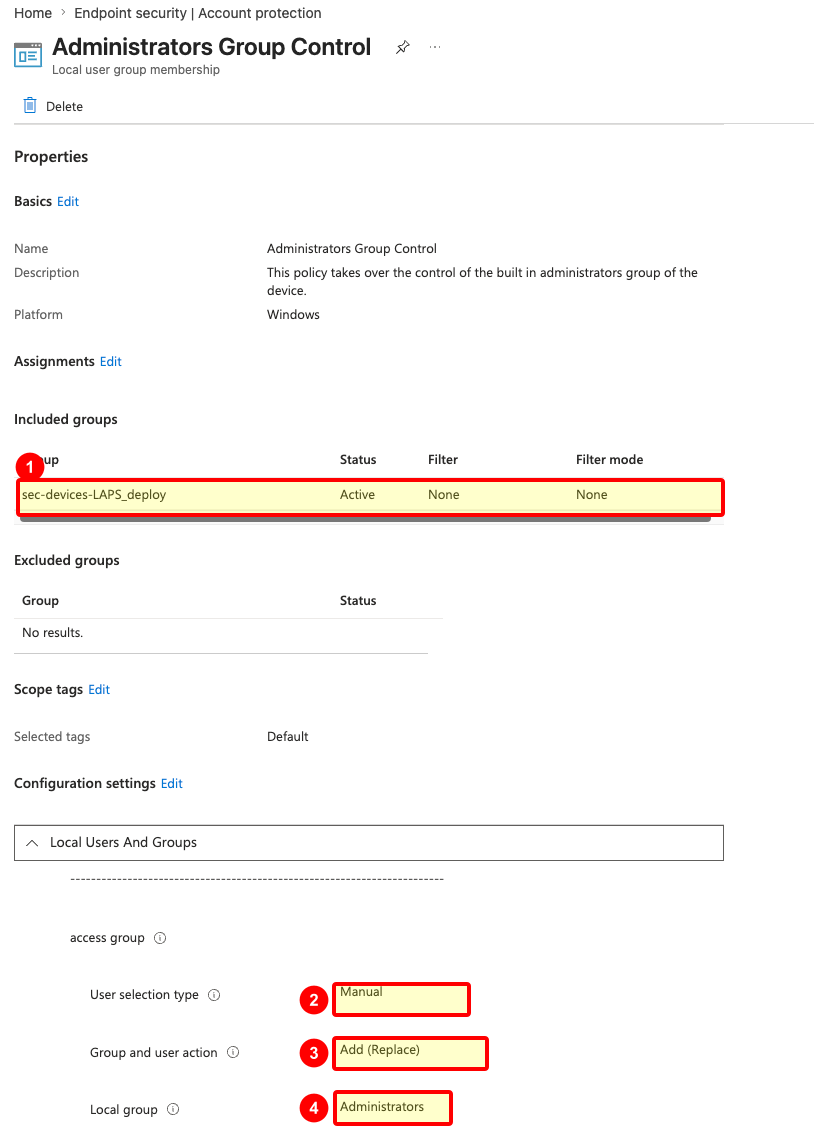
Here is the final policy view. The screenshot is not showing every wizard click; it is showing what you should confirm after the policy is created. Marker 1 is the pilot assignment group. 2 is Manual selection, 3 is Add (Replace), and 4 is the Administrators group as the target.
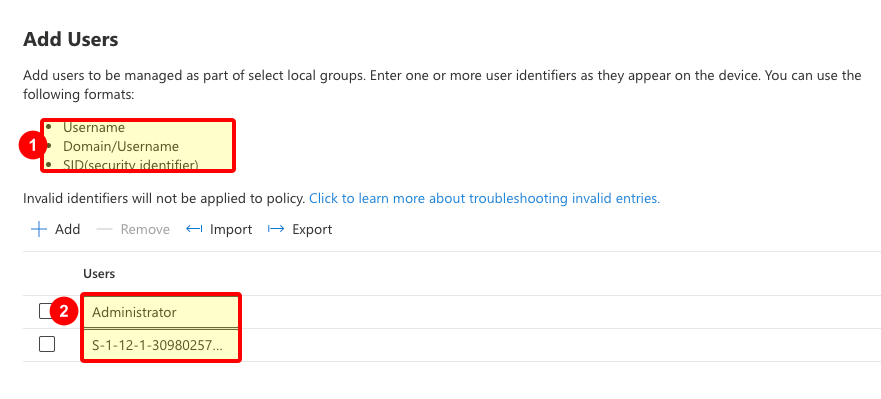
When you select users manually, add the entries one per row. Keep Administrator in the list, then add the tenant-specific SIDs for the Entra roles or groups you want to retain.
The manual entry pane accepts username, domain\username, or SID. For Entra roles and groups, use the SID. In the screenshot, 1 marks the supported input formats. 2 marks the user list, where Administrator goes first, followed by the Entra role or group SIDs you collected earlier.
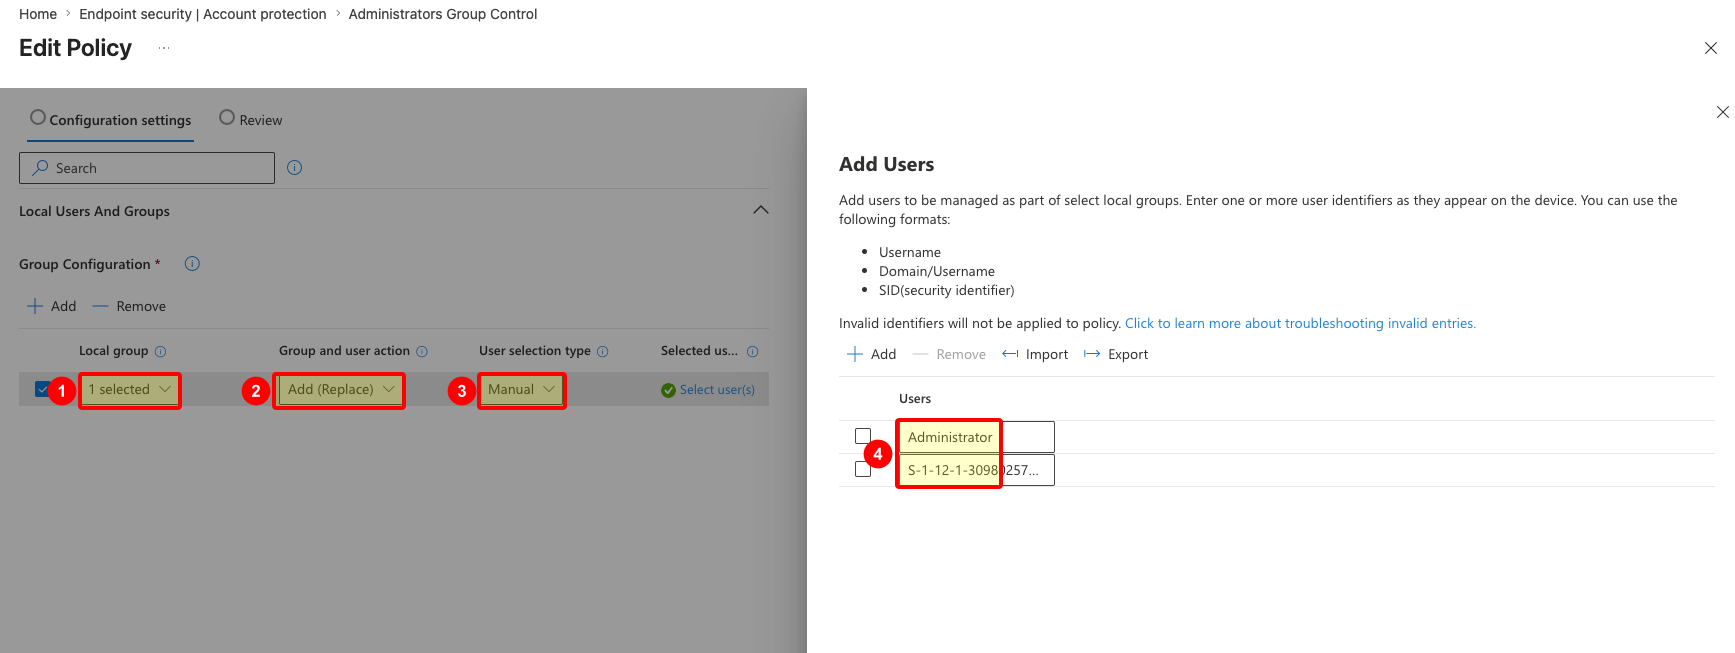
This wider screenshot shows the same thing in context. The relevant parts are 1 for the local group, 2 for Add (Replace), 3 for Manual selection, and 4 for the selected user list containing Administrator plus an Entra SID.
After the policy applies, the device should no longer keep random historical local administrators around. If someone was local admin because they enrolled the device, because a tech added them manually, or because of some old process nobody remembers, they should be removed unless you explicitly kept them.
That is the point.
Create the Windows LAPS policy
Now create the fallback.
Go to Endpoint security > Account protection > Create Policy again.
Use these values:
- Platform: Windows
- Profile: Local admin password solution (Windows LAPS)
- Name: something obvious, such as
LAPS standard - Assignment: the same pilot device group
For a simple starting policy on cloud-native devices, use settings like these:
- Backup Directory: Backup the password to Microsoft Entra ID only
- Password Age Days: 30
- Password Complexity: Passphrase (short words)
- Passphrase Length: 4
- Post Authentication Actions: reset the password, log off the managed account, and terminate remaining processes
- Post Authentication Reset Delay: 2
- Automatic Account Management Enabled: the target account will be automatically managed
- Automatic Account Management Target: manage the built-in administrator account
The passphrase option is a hill I will happily stand on. A helpdesk person reading a 28-character symbol soup over a phone call is how you create pain. A short passphrase is still managed, rotated, and unique per device, and it is much easier to type correctly when you are already dealing with a broken machine.
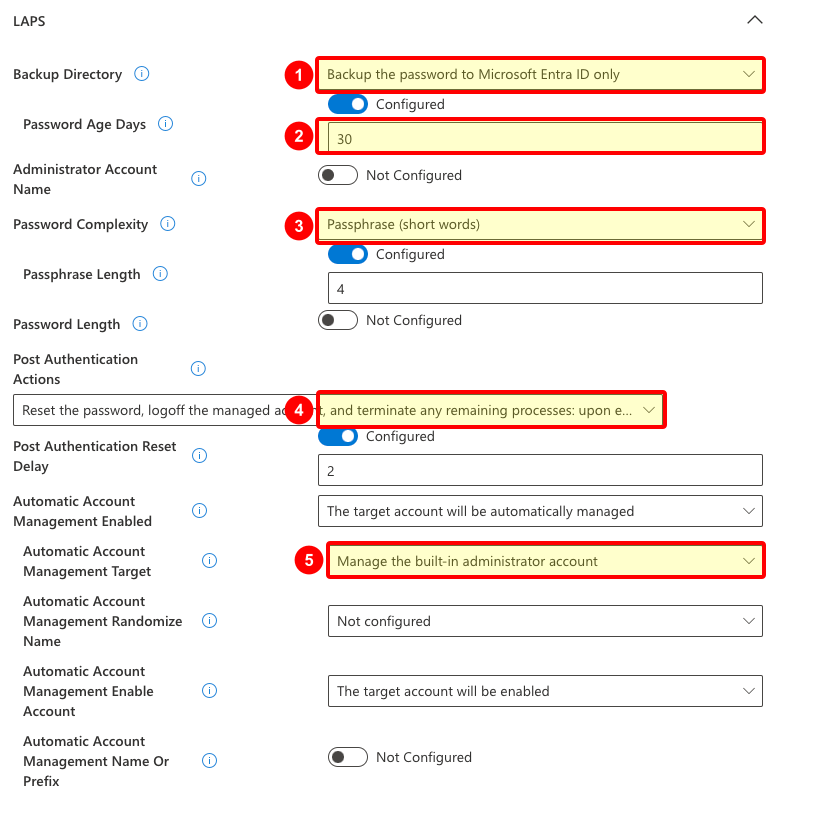
The cropped screenshot below shows the settings as you configure them in the policy wizard. The numbered markers are 1 for Backup Directory, 2 for Password Age Days, 3 for Password Complexity, 4 for Post Authentication Actions, and 5 for Automatic Account Management Target.
Leave Administrator Account Name not configured if you want Windows LAPS to manage the built-in local Administrator account by its well-known RID. Microsoft documents that when this setting is blank, LAPS defaults to the built-in local admin account.
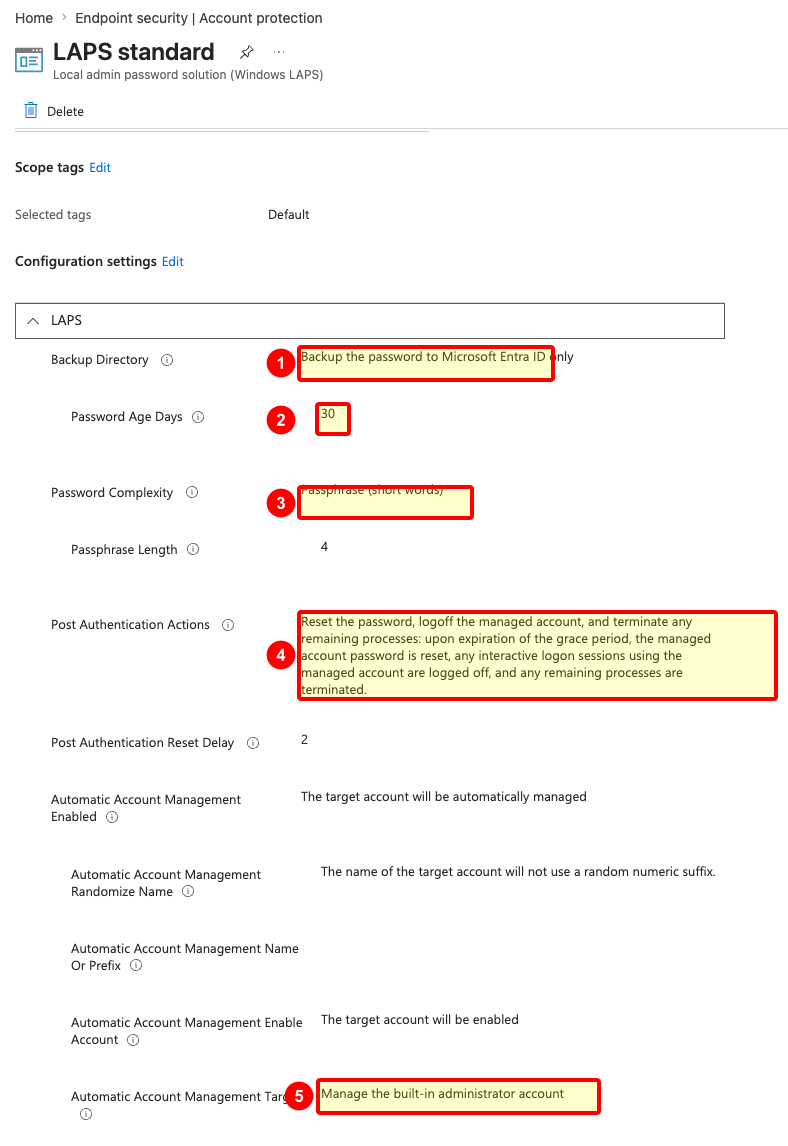
Here is what the final LAPS policy looks like in my example. The numbered markers match the same settings: 1 is Entra ID backup, 2 is the rotation age, 3 is the readable passphrase format, 4 is post-authentication cleanup, and 5 is the built-in Administrator account as the managed account.
Check the result on a device
Give the device time to sync, or trigger a sync from Intune or Company Portal.
Then check three things:
- The Administrators group contains only the accounts and SIDs you expect.
- The normal user is not a local administrator.
- The LAPS password is backed up and visible to the right admin roles in Intune or Entra.
Do not skip this part. A policy that looks right in Intune but never lands on the device is just decoration.
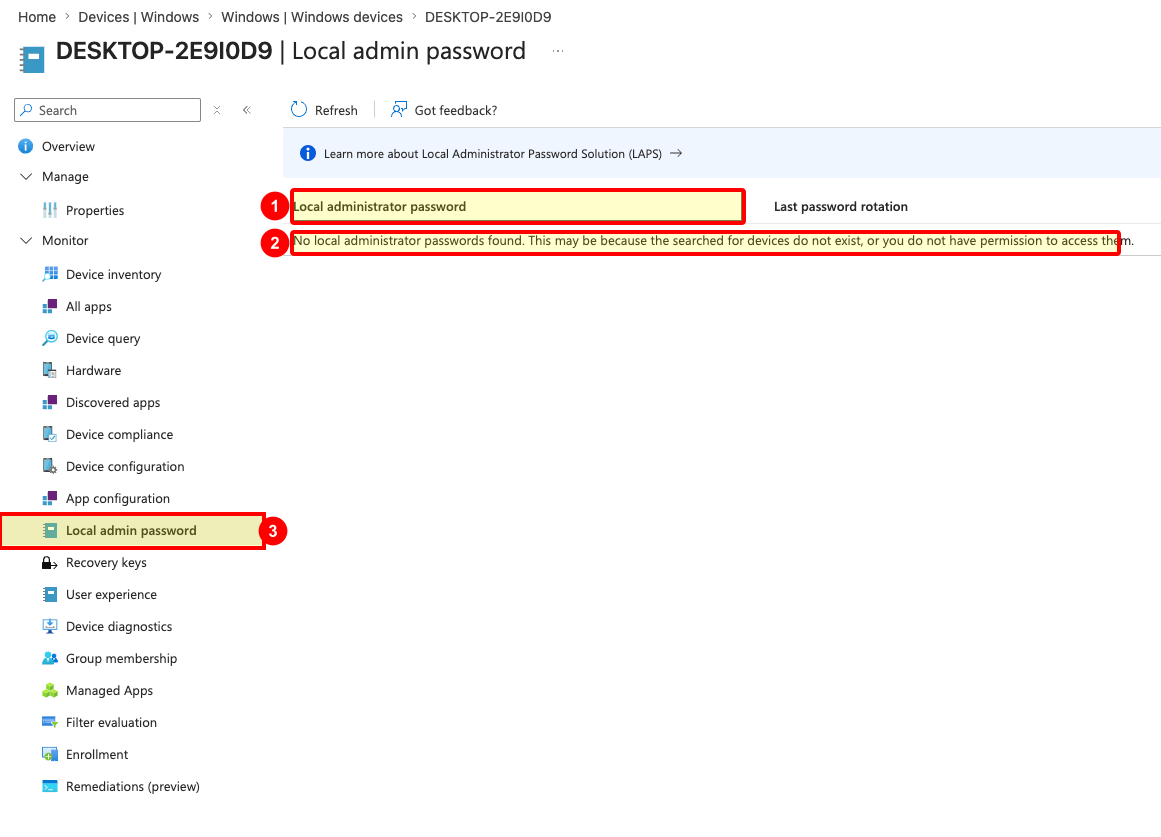
In Intune, open a Windows device, go to Monitor > Local admin password, and check whether the password has been backed up. In the screenshot, 1 is the password list, 2 is the empty-state message you may see before a password appears, and 3 is the Local admin password navigation item.
If you see no password yet, it does not automatically mean the policy is wrong. The device may not have synced, the first backup may not have happened yet, or your account may not have the right permission to read the password. Microsoft documents that viewing password details requires the relevant Microsoft Entra device local credentials permissions.
If the local group does not look right, check the assignment first. Then check whether another policy is also managing the same local group. Microsoft documents that if Replace and Update both target the same group, Replace wins, but that does not make overlapping policies fun to troubleshoot. Keep this clean.
My default stance
No regular user should be a local admin.
No app deployment process should depend on the user being a local admin.
No helpdesk process should require a shared local admin password copied from an old spreadsheet. Yes, that spreadsheet. We both know it exists somewhere.
Use Intune to deploy the stuff. Use the local group membership policy to decide who gets admin rights. Use Windows LAPS as the fallback when you need to get into a box and fix it.
That is a simple starting point, and it is already miles better than hoping local admin rights will somehow stay tidy by themselves.