Contents Jump to section
No VPN, No Internet: Building a Windows Firewall Kill Switch for FortiClient with Intune
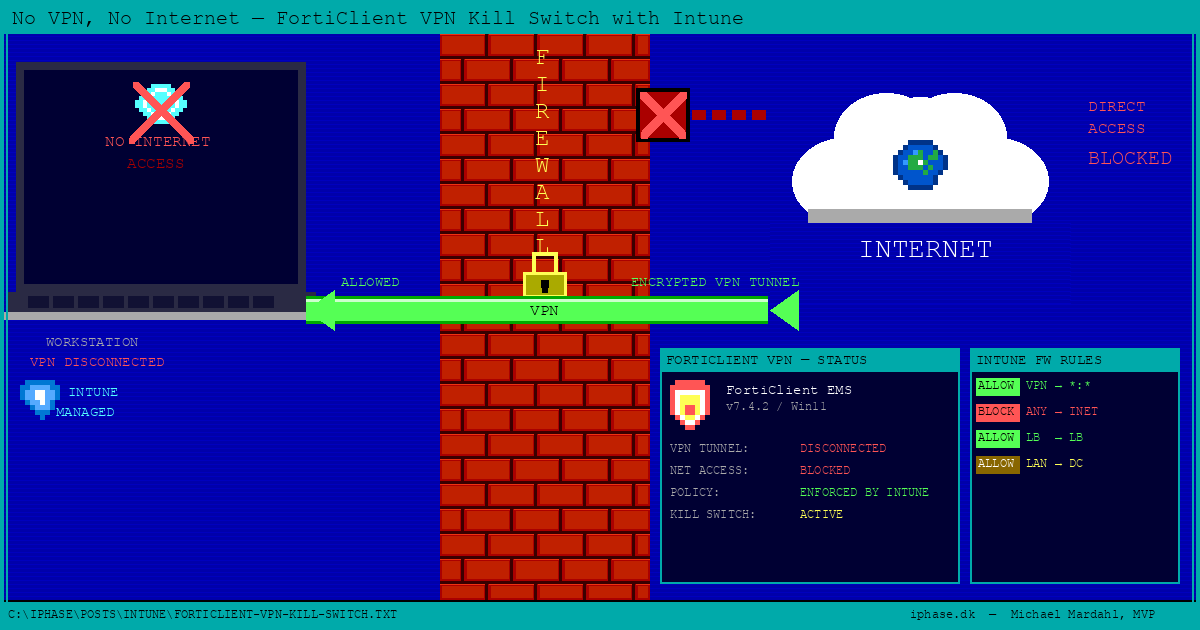
FortiClient VPN kill switch using Windows Firewall and Intune. In this post you will learn how to prevent Windows 11 machines from accessing the internet when not connected to your corporate VPN — and all the things that go wrong along the way.
Disclaimer: This is a proof-of-concept that has not been thoroughly tested across all environments at the time of writing. Your mileage may vary. But sharing is caring, so here we are. Do your own tests before deploying this to production, Mmmkay? If you need a real kill switch, skip to the "The elephant in the room" section at the end.
Ever had one of those "perfectly reasonable" requests that spirals into a full-blown deep dive through Windows Firewall internals, adapter classification quirks, and chicken-and-egg problems you didn't know existed? Yeah, me too. Just recently, in fact.
Of course, like every other person trying to keep up with all the new stuff these days, I used AI to help me work through the problem. Specifically, I paired up with Claude (Anthropic's AI) and together we iterated through solutions in real time. So when I say "we" throughout this post, I mean me and my tireless AI colleague who never once complained about the fifth script rewrite. Good times.
Let me share the journey with you good folks reading this blog, because I think it might save someone out there from going mad.
The problem
The environment: Windows 11 devices running the standalone FortiClient VPN (no EMS, no FortiGate integration beyond the tunnel itself). The requirement: if the VPN is down, the internet is off. Local network traffic? Fine. Public internet? Not without the tunnel.
How hard could it be? (Narrator: it was hard-ish.)
The obvious answer (that wasn't)
The first instinct is the right one: use the Windows Firewall. Set the default outbound action to Block, add allow rules for the VPN client, and call it a day. It's built into the OS, it's free, it doesn't require third-party software, and it survives reboots. What's not to love?
Well, as it turns out, quite a lot.
Attempt 1: Block everything, allow the VPN adapter
The initial approach was straightforward:
- Set
DefaultOutboundActiontoBlockon all firewall profiles - Allow FortiClient executables so the VPN can establish
- Allow traffic on the Fortinet VPN adapter by its
InterfaceAlias
Step 3 is where the first crack appeared. The New-NetFirewallRule cmdlet with -InterfaceAlias does not play nicely with virtual VPN adapters. The adapter exists in a sort of Schrödinger's state — it's technically present even when the VPN is disconnected, but the firewall doesn't always agree that it's a real interface worth filtering on.
We also briefly explored using InterfaceTypes = RemoteAccess to scope rules to the VPN adapter. Sounds right — it's a remote access tunnel, after all. But FortiClient's virtual adapter doesn't necessarily register as RemoteAccess in Windows. Depending on the driver version and VPN type (SSL vs IPsec), it can show up as Lan. You can check what Windows actually thinks with Get-NetAdapter | Select-Object Name, InterfaceDescription, NdisPhysicalMedium — and you should, before trusting any InterfaceTypes-based rule.
Q: What error did you get?
A: An unhelpful one. As is tradition with Windows Firewall.
Attempt 2: The profile trick
With some digging, we discovered something promising. When FortiClient's SSL VPN connects, its virtual adapter (Fortinet SSL VPN Virtual Ethernet Adapter) registers under the Domain firewall profile — because the tunnel reaches the corporate network where a Domain Controller lives. Meanwhile, the physical NIC sits on Public or Private.
This led to an elegant idea: block outbound on Public and Private, leave Domain as Allow. The VPN tunnel traffic flows through the Domain-profile adapter, so everything works once connected.
Except it didn't.
The VPN adapter starts its life as Public. Windows NLA (Network Location Awareness) needs to reach a Domain Controller to reclassify the adapter as Domain. But we've blocked outbound on Public. So NLA can't reach the DC. So the adapter stays Public. So traffic stays blocked. So NLA can't reach the DC...
This is what we in the industry call a chicken-and-egg problem, and what I in the moment called something my mother wouldn't approve of.
Side note for the curious: This NLA behavior is actually a known issue documented by Fortinet. When FortiClient connects, route installation lags behind adapter creation, so NLA can't reach the DC in time. Even without our firewall blocking, the profile flip is unreliable. Fortinet's workaround is to set NegativeCachePeriod = 0 in HKLM\SYSTEM\CurrentControlSet\Services\NetLogon\Parameters. But even with that fix, the timing remained too unpredictable for our use case.
Attempt 3: Allow svchost — surely THAT fixes it
NLA runs as a service inside svchost.exe. If we allow svchost outbound on all profiles, NLA can reach the DC, detect the domain, flip the adapter to Domain profile, and our elegant solution works.
It did not work.
Even with svchost allowed, the NLA detection through a VPN tunnel proved unreliable. The adapter stubbornly remained on Public. Whether this was a timing issue, a caching issue, or Windows simply having a bad day — the result was the same: no Domain profile, no internet. I did find a few discussions online about scripts and reg settings to solve this, but I did not want to go down that route in this PoC.
This is where I went full Claude Opus 4.6 extended thinking mode. We threw everything at it — restarting the NLA service, adding delays, praying to the firewall gods. Nothing. The profile would not flip consistently.
The breakthrough: Stop fighting profiles
After several rounds of increasingly creative (and decreasingly dignified) troubleshooting, the solution came from stepping back and asking: why are we fighting the profile system at all?
The VPN runs in full-tunnel mode. That means when it's connected, all traffic — including internet-bound traffic — routes through the tunnel. And what does the tunnel look like from a routing perspective? It's a gateway on a private IP address.
That's the key insight right there.
Instead of trying to detect which profile the adapter is on, we can "simply":
- Block all outbound on all profiles (Domain, Private, Public)
- Allow outbound to all private IP ranges (RFC1918 + link-local + multicast + loopback)
- Allow FortiClient executables (so the VPN tunnel can establish to the public gateway)
- Allow svchost.exe (for DNS, DHCP, NCSI, and NLA)
- Allow Intune and Defender (so the device stays managed and protected — more on this later)
When the VPN is disconnected, the device can only talk to private IPs — local network, printers, file shares, all fine. But no public internet. When the VPN connects, the full-tunnel routes all traffic through the tunnel's private gateway IP, which is allowed by our RFC1918 rule. Internet works, routed through the corporate network.
No profile detection needed. No adapter alias games. No NLA timing issues. Beautiful.
The private IP ranges we allow:
| Range | Purpose |
|---|---|
10.0.0.0/8 | RFC1918 Class A |
172.16.0.0/12 | RFC1918 Class B |
192.168.0.0/16 | RFC1918 Class C |
169.254.0.0/16 | Link-local / APIPA |
224.0.0.0/4 | Multicast |
255.255.255.255/32 | Broadcast |
127.0.0.0/8 | Loopback |
Keeping the device managed: Intune agents and Defender
Now, blocking all outbound is a bold move. You know what also needs outbound access to keep working? The very system that's enforcing your policy. Don't lock yourself out of the house, folks.
We need to make sure the Intune management agents and Windows Defender can phone home regardless of VPN state.
Intune Management Extension:
| Process | Path |
|---|---|
| IME Agent | C:\Program Files (x86)\Microsoft Intune Management Extension\Microsoft.Management.Services.IntuneWindowsAgent.exe |
| AgentExecutor | C:\Program Files (x86)\Microsoft Intune Management Extension\AgentExecutor.exe |
| ClientHealthEval | C:\Program Files (x86)\Microsoft Intune Management Extension\ClientHealthEval.exe |
| SensorService | C:\Program Files (x86)\Microsoft Intune Management Extension\SensorService.exe |
Other system processes:
| Process | Path |
|---|---|
| Device Enroller | C:\Windows\System32\deviceenroller.exe |
Windows Defender — and here's a fun one. Defender's executables (MsMpEng.exe, MpCmdRun.exe, NisSrv.exe) live under C:\ProgramData\Microsoft\Windows Defender\Platform\<version>\. That version folder changes with every Defender update.
Q: Can't you just use a wildcard path?
A: No. And I know this because I tried it years ago, and it didn't work. Microsoft's own documentation confirms: wildcard patterns like C:\*\executable.exe are not supported in Windows Firewall application rules. Only full paths. Still. In 2026. Cool.
The workaround is to use the service name filter instead of the file path. Windows Defender runs as the WinDefend service, and Intune firewall rules have a dedicated "Service name" field. Problem solved — and version-folder-proof.
Q: What about the OMA-DM client for Intune sync?
A: It runs inside svchost.exe via the dmwappushservice, so that's already covered by our svchost allow rule. Same goes for Windows Update and BITS.
The rule bypass problem
With the default outbound set to Block, the next issue was that Windows ships with dozens of pre-existing outbound allow rules. Any one of these could let traffic escape without VPN. Worse, any application installed with admin privileges can create new outbound allow rules at will.
This is where the deployment method matters - and where we need to talk about doing this properly.
The Intune solution (the right way)
The production-grade approach uses two Intune Endpoint Security > Firewall policies. Both are created in the same place:
- Open the Intune admin center (intune.microsoft.com)
- Navigate to Endpoint security > Firewall
- Click Create policy
- Platform: Windows
From there, the Profile dropdown is where the two policies diverge:
- For Policy 1, select Windows Firewall — this is where profile-level defaults live
- For Policy 2, select Windows Firewall Rules — this is where individual allow/block rules go
Policy 1: Windows Firewall Profile
This configures the firewall defaults for all three profiles:
- Default Outbound Action: Block
- Ignore all local firewall rules: Yes
- Ignore authorized application firewall rules: Yes
- Ignore global port firewall rules: Yes
- Ignore connection security rules: Yes
- Allow Local Policy Merge: No
Those four "Ignore" settings are the critical piece. They tell the firewall to disregard every rule in the local store — including Windows defaults and anything installed by software. Only rules delivered via Intune's Endpoint Security Firewall Rules policy are active. This completely eliminates the rule bypass problem. No software can add its own exceptions. No user can create a sneaky allow rule. The MDM policy store is king.
The AllowLocalPolicyMerge = No setting (via ./Vendor/MSFT/Firewall/MdmStore/{Profile}/AllowLocalPolicyMerge) is the belt to the "Ignore" suspenders. Without it, locally-added rules can still merge into the active policy store and create bypass paths. Set it on all three profiles.
Policy 2: Windows Firewall Rules
This delivers the specific allow rules. Here's the full set:
Infrastructure rules:
| Rule | Direction | Action | Details |
|---|---|---|---|
| Allow Private IPs | Out | Allow | Remote addresses: 10.0.0.0/8, 172.16.0.0/12, 192.168.0.0/16, 169.254.0.0/16, 224.0.0.0/4, 255.255.255.255/32, 127.0.0.0/8 |
| Allow svchost | Out | Allow | File path: C:\Windows\System32\svchost.exe |
| Allow Device Enroller | Out | Allow | File path: C:\Windows\System32\deviceenroller.exe |
| Allow Defender (WinDefend) | Out | Allow | Service name: WinDefend (no file path — avoids the version folder problem) |
FortiClient rules (one per executable, all Outbound / Allow):
| Rule | File Path |
|---|---|
| Allow FortiClient | C:\Program Files\Fortinet\FortiClient\FortiClient.exe |
| Allow FortiClientConsole | C:\Program Files\Fortinet\FortiClient\FortiClientConsole.exe |
| Allow FortiClientSecurity | C:\Program Files\Fortinet\FortiClient\FortiClientSecurity.exe |
| Allow FortiSSLVPNdaemon | C:\Program Files\Fortinet\FortiClient\FortiSSLVPNdaemon.exe |
| Allow FortiSSLVPNsys | C:\Program Files\Fortinet\FortiClient\FortiSSLVPNsys.exe |
| Allow FortiTray | C:\Program Files\Fortinet\FortiClient\FortiTray.exe |
| Allow FortiVPN | C:\Program Files\Fortinet\FortiClient\FortiVPN.exe |
| Allow FortiGui | C:\Program Files\Fortinet\FortiClient\FortiGui.exe |
| Allow FortiAuth | C:\Program Files\Fortinet\FortiClient\FortiAuth.exe |
| Allow FCAuth | C:\Program Files\Fortinet\FortiClient\FCAuth.exe |
| Allow FCCOMInt | C:\Program Files\Fortinet\FortiClient\FCCOMInt.exe |
| Allow FCConfig | C:\Program Files\Fortinet\FortiClient\FCConfig.exe |
| Allow ipsec | C:\Program Files\Fortinet\FortiClient\ipsec.exe |
| Allow FSSOMA | C:\Program Files\Fortinet\FortiClient\FSSOMA.exe |
Intune Management Extension rules (one per executable, all Outbound / Allow):
| Rule | File Path |
|---|---|
| Allow IME Agent | C:\Program Files (x86)\Microsoft Intune Management Extension\Microsoft.Management.Services.IntuneWindowsAgent.exe |
| Allow AgentExecutor | C:\Program Files (x86)\Microsoft Intune Management Extension\AgentExecutor.exe |
| Allow ClientHealthEval | C:\Program Files (x86)\Microsoft Intune Management Extension\ClientHealthEval.exe |
| Allow SensorService | C:\Program Files (x86)\Microsoft Intune Management Extension\SensorService.exe |
That's 23 rules total — well within Intune's 150-rule-per-policy limit. Plenty of room for your future "oh wait, we also need this" moments.
Why two policies? (Blame Intune)
You might be wondering why we don't just put everything in one policy. So did I. The answer is: Intune won't let you. The firewall profile settings (DefaultOutboundAction, the "Ignore" toggles, AllowLocalPolicyMerge) and the firewall rules (individual allow entries) are separate policy templates under Endpoint Security > Firewall. You can't mix them. Two policies is not a design choice — it's a constraint.
Just make sure you assign both policies to the same group. If a device somehow gets the block profile without the allow rules, nothing goes outbound — including Intune sync — and you'll need physical access to unenroll from MDM. Don't do that to yourself.
Verification
After both policies apply, run these on a target device:
# Confirm outbound is blocked
Get-NetFirewallProfile | Format-Table Name, DefaultOutboundAction

# Confirm only Intune rules are active
Get-NetFirewallRule -PolicyStore ActiveStore -Direction Outbound -Action Allow -Enabled True |
    Format-Table DisplayName

# Test: VPN off, no internet
Test-NetConnection google.com -Port 443

# Test: VPN on, internet works
Test-NetConnection google.com -Port 443
The PoC scripts (for testing only)
During the development of this solution, we wrote PowerShell setup and undo scripts to rapidly iterate without waiting for Intune sync cycles. I've published these to GitHub so you can use them for your own testing:
GitHub: github.com/mardahl/PSBucket/tree/master/FortinetVPNKillSwitch
Setup-VPNKillSwitch.ps1— Applies the kill switch configurationUndo-VPNKillSwitch.ps1— Reverts to the previous firewall stateDetect-VPNKillSwitch.ps1— Detection script for Intune Win32 packaging
Important: These scripts were built as proof-of-concept tooling to iterate quickly during development. They do not include all the Intune Management Extension, Device Enroller, and Windows Defender exclusions that we recommend for production use. If you use the scripts as-is, Intune sync and Defender updates may be blocked when the VPN is disconnected. For a complete production deployment, use the Intune Firewall Policy approach described above.
The security caveat: scripts vs. Intune policy
Here's the important distinction: the PowerShell scripts and the Intune Firewall Policy are not equivalent from a security perspective.
The scripts manipulate the local firewall store. This means:
- Any local administrator can undo them
- Any software running with admin privileges can add outbound allow rules that bypass the block
- The scripts disable pre-existing rules, but new ones can appear at any time
- There is no continuous enforcement — if someone reverts the changes, they stay reverted
The Intune Firewall Policy leverages the MDM policy store and the "Ignore local rules" CSP settings. This means:
- Local firewall rules are completely inactive — even if they exist, they have no effect
- New rules created locally are also ignored
- The policy is continuously enforced and re-applied on every Intune sync
- Users cannot override it without unenrolling from Intune
Use the scripts for testing. Use Intune for production.
What this doesn't cover (the honest part)
Alright, I spent a few hours on this and it works for a PoC. But if you're thinking of deploying this as a security control rather than a convenience feature, here's the list of things that will keep a security auditor up at night. I'm sharing these not to undermine the solution, but because honesty is more useful than false confidence.
IPv6: The silent leak
Everything above is IPv4 only. Windows has IPv6 enabled by default, and IPv6 traffic — including Teredo tunneling — will happily bypass your carefully crafted IPv4 rules. If you're serious about this, you need parallel IPv6 blocking rules, or you need to disable IPv6 on all physical adapters and kill Teredo with netsh interface teredo set state disabled. This is the kind of thing that's easy to forget and embarrassing to discover.
svchost.exe: The skeleton key
Yes, allowing svchost.exe outbound on all profiles is necessary. It's also a massive hole. Svchost hosts DNS, DHCP, BITS, Windows Update, NLA, the OMA-DM client, and roughly a hundred other services. By allowing it unrestricted outbound access, we've effectively given a large chunk of Windows networking a free pass to talk to the internet without VPN. Any service running under svchost can reach out.
For a PoC, this is acceptable. For a security-hardened deployment, you'd want to scope this down — for example, allowing svchost only for specific service SIDs (like dnscache and Dhcp) or restricting it to specific remote ports (53, 67, 68) and destination IPs. The Firewall CSP supports the ServiceName filter on rules, which helps. But doing this correctly is a project in itself, and I didn't want to overengineer a PoC.
Captive portals: Mostly fine, actually
Since we allow all RFC1918 traffic and svchost handles DNS, most captive portals just work. The device gets DHCP, DNS resolves, and the portal login page — typically hosted on the gateway's private IP — is reachable by any process. The user authenticates, the network opens, and public internet remains blocked until the VPN connects. Exactly as intended.
The one edge case: some enterprise WiFi systems redirect to a cloud-hosted authentication portal on a public IP. That would be blocked. In practice, this is uncommon for typical hotel and airport WiFi, but it's worth knowing it's possible.
Boot-time gap
Between system startup and when the Base Filtering Engine (BFE) service initializes, traffic can flow unfiltered. Standard Windows Firewall rules provide no boot-time protection. Professional VPN clients solve this with persistent WFP boot-time filters — a capability not available through the Firewall CSP. For most use cases this gap is measured in seconds and is largely theoretical, but it exists and a thorough security review would flag it.
WFP sublayer ordering
The Windows Firewall operates in a specific WFP (Windows Filtering Platform) sublayer. Other applications — including some VPN clients, endpoint security products, and even malware — can create their own WFP sublayers with higher weights that override the firewall's block with a hard Permit. Your Windows Firewall kill switch is only as strong as the assumption that nothing else is manipulating WFP at a higher priority. In practice this is rarely an issue on managed devices, but it's worth knowing.
CVE-2024-3661 (TunnelVision)
This is a fun one. A rogue DHCP server on the local network can inject static routes via DHCP Option 121, causing traffic to bypass the VPN tunnel entirely while the VPN appears to be connected. Our approach — blocking by default and allowing private IP ranges — should mitigate TunnelVision better than a route-based kill switch, because traffic is still constrained by firewall rules rather than routing table entries. But "should mitigate" and "definitely mitigates" are different things, and I haven't tested this specific attack against the PoC. If this threat vector matters to you, test it.
FortiClient executable allow rules
We're allowing 14 FortiClient executables to talk outbound to any destination. That's necessary for the VPN to establish its tunnel to the public gateway. But it also means those executables can reach any IP on the internet, VPN or not. If any of those binaries were compromised or had a vulnerability, they'd have unrestricted outbound access. A tighter approach would restrict them to the specific VPN gateway IP(s) — if your environment has a small, stable set of gateways.
The elephant in the room: FortiClient EMS Network Lockdown
I'd be doing you a disservice if I didn't mention this. If you're running FortiClient with FortiClient EMS (the paid, managed version), Fortinet already built exactly what we're trying to build here. It's called Network Lockdown, introduced in FortiClient 7.2.1 for SSL VPN and extended to IPsec in 7.2.5.
Network Lockdown does everything our PoC does, plus:
- Captive portal detection with a configurable grace period (default 120 seconds)
- Exception lists for allowed applications, IPs, and domains
- Automatic enforcement that doesn't depend on Windows Firewall or WFP sublayer ordering
- Centralized management through the EMS console
It handles the edge cases we listed above — IPv6, boot-time protection, WFP sublayer ordering — properly and out of the box.
The reason we went down the Windows Firewall path is that this environment uses the standalone free FortiClient VPN — no EMS, no FortiGate fabric integration. If that's your situation too, this PoC is a reasonable starting point. But if you have EMS licensing (or can justify the cost), use Network Lockdown instead. It's purpose-built for this exact problem and it handles the edge cases properly.
The Windows Firewall approach is a can we do this? exercise. Network Lockdown is the should we do this? answer.
Final Words
What started as "just block outbound and allow the VPN" turned into a tour through Windows Firewall profile classification, NLA detection quirks, virtual adapter behavior, wildcard paths that Microsoft still doesn't support in 2026, and the nuances of local vs. MDM policy stores.
The final solution is relatively simple: block all outbound, allow private IPs, allow the VPN client, allow svchost, allow Intune agents, and allow Defender by service name. Five concepts, twenty-three rules, two Intune policies, and the reasonable expectation that your users aren't browsing the internet from a hotel Wi-Fi without the corporate tunnel.
Is it perfect? No. The honest-to-goodness truth is that a few hours of work with Windows Firewall and Intune gets you maybe 80% of the way to a real kill switch. The remaining 20% — IPv6, boot-time gaps, WFP sublayer shenanigans, svchost being a wide-open door — is where commercial solutions earn their keep. But for a PoC that demonstrates the concept and blocks the casual "I'll just disconnect the VPN and browse directly" scenario? It works.
The journey to get there was anything but simple. But that's why we share, right?
Please bear in mind that this knowledge is shared for learning purposes only. Do your own tests before deploying this into production environments.
Final disclaimer: This is a proof-of-concept. It was born from real-world need and tested on a limited set of devices, but it has not been validated across every FortiClient version, Windows 11 build, or network configuration. The Intune policies and PowerShell scripts are provided as-is with no warranty. If you find issues or improvements, contribute back to the GitHub repo. Sharing is caring!
And if you've found an even more creative way for NLA to refuse to detect a domain network, reach out — misery loves company.